
Building a CI/CD pipeline for my Jekyll website
Published:
The website you’re on right now is not managed by a content management system. All content is written in Markdown. Before executing the steps in this blog post I had to change the Markdown files locally, upload them to this server and execute a jekyll build to deploy the website. These are manual steps that can easily be automated. In this blog post I will explain how i used git to build following continuous integration and deployment (CI/CD) pipeline for my Jekyll site:
Pre-requisites
- You have a Jekyll site deployed on your server. If you don’t, follow this guide: Step by Step Jekyll site tutorial.
Creating the remote repository:
Start with installing git on the server:
sudo apt-get install git-all
Verify if git is succesfully installed with:
git version
Create a new directory in your home directory:
mkdir website.git
Initialize a ‘bare’ git repository in website.git:
git init --bare website.git
After executing this command, execute an ls -l website.git. The result should be:
-rw-rw-r--  1 xxx xxx   23 Nov 24 19:11 HEAD
drwxrwxr-x  2 xxx xxx 4096 Nov 24 19:11 branches/
-rw-rw-r--  1 xxx xxx   66 Nov 24 19:11 config
-rw-rw-r--  1 xxx xxx   73 Nov 24 19:11 description
drwxrwxr-x  2 xxx xxx 4096 Nov 24 19:56 hooks/
drwxrwxr-x  2 xxx xxx 4096 Nov 24 19:11 info/
drwxrwxr-x 18 xxx xxx 4096 Nov 24 20:29 objects/
drwxrwxr-x  4 xxx xxx 4096 Nov 24 19:11 refs/
If the output is identical to the list above, you have now succesfully created your remote repository.
This is a bare git repository. It is the same as a default repository, but no commits can be made in a bare repository as it does not have a working tree. A working tree is a directory in which all the project files and directories are located.
The next step is to configure the git hooks.
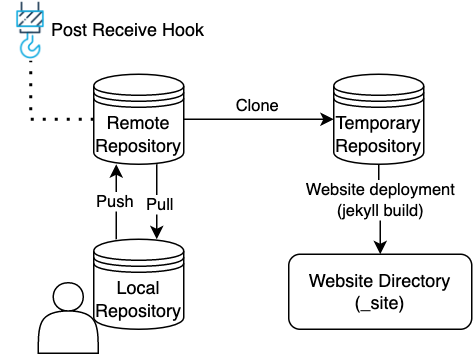
Automating Jekyll deployment with git hooks
Git hooks are scripts that are automatically executed every time a particular event occurs in a git repository. In our case, we want our website to be deployed when a change has been pushed into the website.git repository. To do this, we will create a post-receive hook which clones the bare website.git repository into a temporary directory and deploy our website from there. When the website is deployed, the temporary directory containing the cloned repository can be deleted again.
Create a post-receive hook: vi website.git/hooks/post-receive.
Paste following code:
#!/usr/bin/env bash

GIT_REPO=$HOME/website.git
TMP_GIT_CLONE=/tmp/website
PUBLIC_WWW=$HOME/[WEBSITE_DIR]

git clone -b main $GIT_REPO $TMP_GIT_CLONE
pushd $TMP_GIT_CLONE
bundle exec jekyll build -d $PUBLIC_WWW
popd
rm -rf $TMP_GIT_CLONE

exit
- [WEBSITE_DIR] - Jekyll’s
_sitedirectory.
Creating the local repository:
Next thing you need is a local repository that will be used to modify the website content. To do this you will need to install git on your computer. I’m currently working on Mac OS X Monterey which, by default, comes installed with git. If you do not have git installed yet on your local machine, follow this guide: Install Git on any OS. For the next steps we will use the command line interface (CLI).
Open your CLI. Create a new directory for your local repository:
mkdir website-local
In website-local you will clone the remote repository.
Execute following command:
git clone ssh://[USERNAME]@[SERVER]:[SSH_PORT]/home/[USERNAME]/website.git/ website-local
- [USERNAME] - The user used to login on the website
- [SSH_PORT] - SSH port
- [SERVER] - IP adress or hostname
The next step is to add the remote repository. Do this with:
git remote add origin ssh://[USERNAME]@[SERVER]:[SSH_PORT]/home/[USERNAME]/website.git
Checkout the main branch:
git checkout main
Now copy your Jekyll site into your local repository. A basic Jekyll site typically looks something like this:
├── _config.yml
├── _data
│   └── members.yml
├── _drafts
│   ├── begin-with-the-crazy-ideas.md
│   └── on-simplicity-in-technology.md
├── _includes
│   ├── footer.html
│   └── header.html
├── _layouts
│   ├── default.html
│   └── post.html
├── _posts
│   ├── 2007-10-29-why-every-programmer-should-play-nethack.md
│   └── 2009-04-26-barcamp-boston-4-roundup.md
│   ├── _base.scss
│   └── _layout.scss
└── index.html
Make sure Jekyll’s _site directory is not copied into your local repository.
Add and commit the files in your local repository:
git commit -am "initial commit" .
Push the changes to your remote repository:
git push origin
If everything is set up correctly, your terminal output should look something like this:
Enumerating objects: 7, done.
Counting objects: 100% (7/7), done.
Delta compression using up to 8 threads
Compressing objects: 100% (4/4), done.
Writing objects: 100% (4/4), 1.00 KiB | 1.00 MiB/s, done.
Total 4 (delta 3), reused 0 (delta 0), pack-reused 0
remote: Cloning into '/tmp/website'...
remote: done.
remote: /tmp/website ~/website.git
remote: Configuration file: /tmp/website/_config.yml
remote:             Source: /tmp/website
remote:        Destination: [WEBSITE_DIR]
remote:  Incremental build: disabled. Enable with --incremental
remote:       Generating...
remote:        Jekyll Feed: Generating feed for posts
remote:    GitHub Metadata: No GitHub API authentication could be found. Some fields may be missing or have incorrect data.
remote:                     done in 8.853 seconds.
remote:  Auto-regeneration: disabled. Use --watch to enable.
remote: ~/website.git
To ssh://[SERVER]:[SSH_PORT]/home/[USER]/website.git
   439dd41..55d50e7  main -> main
From line 7 you will see the post-receive hook coming into action. The website.git repository is cloned into /tmp/website. Then the jekyll build is initiated, which deploys the website into [WEBSITE_DIR].
That is it. You have now implemented a CI/CD pipeline for your Jekyll site using a git hook.